Jak udostępnić fiolet: warunki, pełny opis procesu
Treść:
Artykuł mówi o tym, jak prawidłowo podzielić fiolet: wybór terminu, przygotowanie rośliny i podłoża, szczegółowy opis procesu.
Fiołki należą do szybko rozwijających się roślin. Co więcej, jak wiadomo, te kwiaty wolą małe pojemniki. Aktywny wzrost, któremu towarzyszy pojawienie się młodych rozetek, a także bujne i długotrwałe kwitnienie, pociąga za sobą dość szybkie wyczerpanie niewielkiej objętości mieszanki gleby. Eksperci nie zalecają opóźniania przeszczepu fiołków, ponieważ brak składników odżywczych szybko wpłynie na walory dekoracyjne rośliny - liście staną się wyblakłe i ospałe, kwiaty zaczną się kurczyć. Ponadto wraz ze wzrostem nowo powstałych rozet roślina mateczna słabnie, przestaje się rozwijać i z czasem może umrzeć.
Błędy popełnione w procesie dzielenia i przesadzania fiołków mogą powodować choroby, a czasem nawet śmierć rośliny. Aby uniknąć takich konsekwencji, przyjrzymy się bliżej cechom tych procedur.
Jak podzielić się fioletem: określenie czasu przeszczepu
Jak podzielić fiołek
Najbardziej oczywistym znakiem wskazującym na potrzebę przeszczepu fioletu jest pojawienie się młodych rozetek - „dzieci”. Z reguły powstaje do kilku z nich jednocześnie, co staje się powodem rywalizacji o jedzenie i oświetlenie. W rezultacie pozostają najbardziej rozwinięte i najsilniejsze gniazda, a słabe giną. Liść, na którym formowane są dzieci, również obumiera, oddając całe pożywienie rosnącym młodym gniazdkom. Przy dużej liczbie uformowanych dzieci i martwych liści stan samej rośliny pogarsza się.
W momencie separacji i przesadzania nowe rozety muszą mieć co najmniej 2 pary rozwiniętych liści. To zalecenie dotyczy większości odmian, z wyjątkiem barwnych fiołków. W przypadku tych odmian dzieci powinny mieć co najmniej dwa razy więcej dobrze rozwiniętych liści. Należy pamiętać, że proces rozwoju dzieci przebiega znacznie aktywniej przy dobrym oświetleniu rośliny. Ponadto należy pamiętać, że młode rozetki różnorodnych odmian są często koloru białego, ich liście są całkowicie pozbawione chlorofilu. Eksperci zalecają sadzenie takich placówek dopiero wtedy, gdy ich liście nabiorą odpowiedniego koloru. Do tego momentu dzieci nie są w stanie samodzielnie się rozwijać, są całkowicie zależne od rośliny matecznej, a przedwczesna separacja jest najprawdopodobniej przyczyną ich śmierci. Możesz także skupić się na wysokości nowych gniazd, powinna ona wynosić co najmniej 3 - 6 cm.
Wiosna najlepiej nadaje się do sadzenia fiołków. Jesienią i zimą, przy ciągłym braku oświetlenia i zbyt suchym powietrzu, trudno jest zapewnić warunki sprzyjające łatwej adaptacji i ukorzenieniu przesadzanych roślin. A latem będziesz musiał stale utrzymywać poziom wilgotności w powietrzu i upewnić się, że na rośliny nie pada bezpośrednie światło słoneczne.
Jak podzielić fiolet podczas przesadzania: wybór pojemności sadzenia
Jak podzielić fiołek
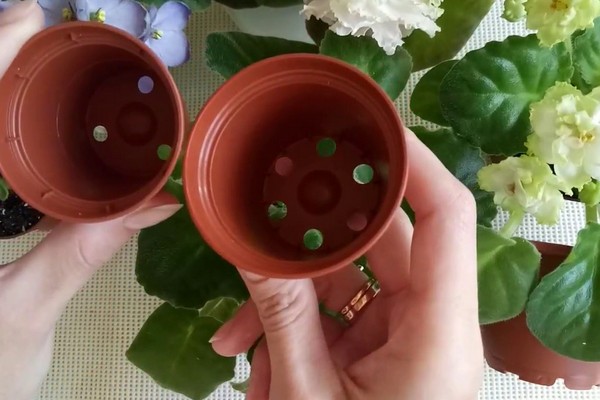
Decydując się na pojemnik do sadzenia dzieci, powinieneś preferować jednorazowe plastikowe kubki. Po pierwsze jest to tańsza opcja, a po drugie ich duży asortyment pozwala wybrać pojemność optymalną pod względem objętości.I wreszcie, wybierając kubki z przezroczystymi ściankami, zawsze możesz kontrolować stan korzeni roślin, reagując w odpowiednim czasie na pojawienie się oznak blokowania, chorób lub inwazji szkodników owadzich. Kwiaciarnie zauważają, że kubki o pojemności zaledwie 100 ml doskonale nadają się do tych celów.
Przypomnij sobie również, jakie problemy wiąże się z sadzeniem roślin w dużych pojemnikach.
Gleba w dużej doniczce nie wysycha równomiernie. Z reguły warstwa powierzchniowa wysycha szybciej, podczas gdy większość gleby pozostaje wilgotna. Zapominając o tym, skupiając się na wystarczająco wysuszonej górnej warstwie, możesz szybko wypełnić młodą roślinę, ponieważ cienkie i słabe korzenie nie są jeszcze w stanie opanować całej objętości wprowadzonej wilgoci.
Ponadto osobliwość rozwoju fioletu polega na tym, że przede wszystkim wyrasta korzenie, a następnie część powietrzna. W związku z tym system korzeniowy młodej rośliny sadzonej w dużej doniczce, która z trudem jest w stanie pokonać wysoką wilgotność gleby, spowoduje, że ukorzenienie i rozwój rozety będą bardzo powolne.
Warto przesadzić fiolet do bardziej przestronnego pojemnika tylko wtedy, gdy korzenie rośliny całkowicie opanują glinianą grudkę.
No i oczywiście należy pamiętać o znanym wśród hodowców fiołków stwierdzeniu, że średnica pojemnika na sadzonki powinna być o połowę mniejsza od średnicy rozety kwiatowej.
Po zajęciu się rozmiarem doniczki zastanów się nad kolejnym pytaniem, które nurtuje początkujących hodowców - która doniczka jest lepsza - plastikowa czy gliniana?
Kwiaciarnie, które mają w swojej kolekcji ponad sto fiołków, preferują oczywiście plastikowe doniczki. Takie pojemniki są mniej nieporęczne, wytrzymują je wszelkie półki, stojaki i doniczki. W razie potrzeby łatwiej jest w nich wykonać wymaganą liczbę otworów drenażowych. Cóż, między innymi plastikowa doniczka jest jednak tańszą opcją.
Doniczki gliniane są przede wszystkim atrakcyjne, ponieważ wykonane są z naturalnego, oddychającego materiału, który zapewnia lepszy przepływ powietrza do korzeni. Również hodowcy kwiatów zwracają uwagę na wysoką dekoracyjność pojemników ceramicznych. Należy jednak zauważyć, że możliwości współczesnego przemysłu są takie, że plastikową doniczkę, czasami tylko po bliższym przyjrzeniu, można odróżnić od ceramiki. Ponadto szereg właściwości, jakie mają gliniane pojemniki, może zaszkodzić roślinie. I tak np. gliniane garnki pod wpływem światła słonecznego dość szybko i mocno się nagrzewają, długo zatrzymując ciepło i powoli stygnąc. W przypadku fiołków takie przegrzanie nie jest pożądane. Z biegiem czasu w porach glinianego garnka gromadzą się również sole, które dostając się do gleby, mają negatywny wpływ na fiolet.
Tym samym hodowcom kwiatów, którzy uważają, że jedyną wadą plastikowego pojemnika jest to, że nie nadaje się on do prezentacji, można zalecić „ukrycie” plastikowych doniczek w glinianych pojemnikach.
Warto zwrócić uwagę na kwestię wielokrotnego używania pojemników do sadzenia. Oczywiście następuje ich ponowne wykorzystanie. Jednak każdorazowo przed użyciem pojemnik należy dokładnie wypłukać i zdezynfekować.
Jak podzielić fiolet w domu: przygotowanie podłoża
Jak podzielić fiołek
Aby fiołek rozwijał się w odpowiednim czasie, wspaniale i przez długi czas, potrzebuje specjalnej mieszanki gleby - bardzo lekkiej, pochłaniającej wilgoć i oddychającej. Taki stan gleby można osiągnąć poprzez dodanie do podłoża włókna kokosowego, torfowca, perlitu, torfu lub piasku rzecznego. W dużych ilościach te składniki nie muszą być dodawane, w przeciwnym razie możesz zaszkodzić roślinie. Wiadomo więc, że mech i torf są w stanie zakwasić glebę, podczas gdy gleba o lekko kwaśnym odczynie jest odpowiednia dla fiołków. Ponadto początkujący hodowcy kwiatów często używają wermikulitu jako proszku do pieczenia.Jednak w przeciwieństwie do perlitu ten minerał długo utrzymuje wilgoć, a to jest obarczone podmoknięciem gleby, co jest całkowicie niedopuszczalne dla fiołków.
Aby zapewnić roślinie przydatne substancje i pierwiastki, do mieszanki gleby można dodać gotowe kompleksy nawozów mineralnych. Jeśli w momencie przygotowania podłoża nawozy nie były pod ręką, karmienie odbywa się po przesadzeniu rośliny, wprowadzając płynną pożywkę pod korzeń. Przed nawożeniem eksperci zalecają podlewanie rośliny.
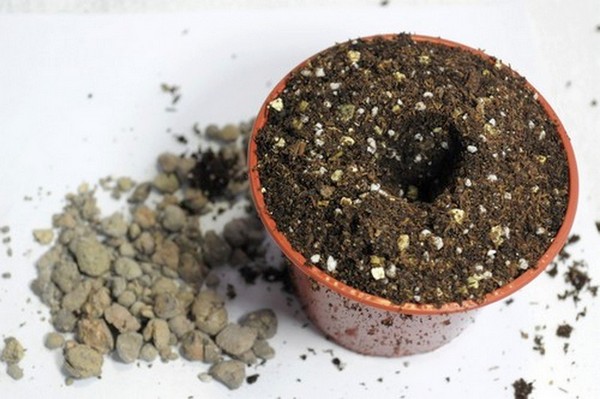
W zbiorniku do sadzenia musi znajdować się warstwa drenażowa, która zapobiegnie blokowaniu gleby i stagnacji wilgoci. Jako drenaż można użyć drobnej keramzytu, fragmentów glinianych naczyń, kamyków, drobnego tłucznia kamiennego lub tłuczonej cegły. Nawiasem mówiąc, coraz więcej hodowców kwiatów używa zwykłego syntetycznego winterizera do tych samych celów. Oprócz tego, że materiał ten doskonale przepuszcza wilgoć, to również nie pozwoli na wysypanie się ziemi przez pojemniki drenażowe, a tace pod donicami zawsze będą czyste.
Dziś wyspecjalizowane sklepy oferują duży asortyment gotowych gleb na fiołki, które zawierają zarówno minimalną wymaganą liczbę składników, jak i różne dodatki, w tym złożone nawozy.
Jednak hodowcy, którzy na bieżąco uprawiają fiołki, nadal radzą, jeśli to możliwe, aby samodzielnie komponować podłoże, zwłaszcza że wszystkie jego składniki można kupić w tych samych centrach ogrodniczych.
W celu przygotowania mieszanki gleby o optymalnym składzie, jako podstawę przyjmuje się ziemię liściastą lub darniową i dodaje się piasek, torf i perlit. Po dokładnym wymieszaniu składników gotowy substrat jest dezynfekowany przez kalcynację w piecu lub obróbkę parą.
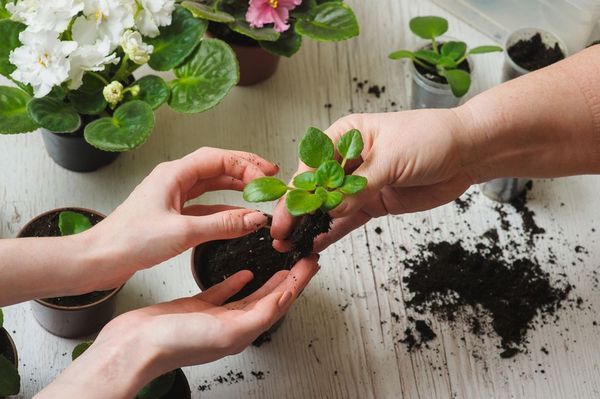
Jak rozdzielić fiolet: proces rozdzielania gniazdek
Proces oddzielania młodych rozetek od rośliny matecznej nie jest trudny, ale wymaga ostrożności i dokładności.
Krzew wraz z grudką ziemi wyjmuje się z pojemnika. Następnie ostrym nożem odcina się liście, na których uformowały się rozety. Następnie, lekko obracając gniazda, oddziel je od samego arkusza. Co więcej, gniazda są już zdemontowane, ostrożnie rozplatając korzenie i liście. Pośpiech w tym przypadku jest bezużyteczny.
Drenaż i trochę podłoża wylewa się na dno pojemnika do sadzenia. Następnie zakłada się roślinę, jednocześnie prostując korzenie. Następnie zaczynają stopniowo wypełniać glebę, lekko ją zagęszczając. Podlewaj przeszczepiony fiołek dobrze osadzoną wodą. Ważne jest, aby po posadzeniu i podlaniu rośliny liście rozety tylko lekko dotykały gleby.
Następnym razem roślina jest podlewana nie wcześniej niż 7-9 dni później. Jednak w tym okresie konieczne jest zapewnienie roślinie niezbędnego poziomu wilgotności powietrza. Aby zapobiec nadmiernemu parowaniu wilgoci i stworzyć roślinie komfortowe warunki do szybkiego ukorzenienia, fiołek przykrywa się szklanym lub plastikowym pojemnikiem lub zwykłą plastikową torbą. W takim przypadku konieczne jest regularne wietrzenie rośliny, usuwając na chwilę schronienie.
Ile lat żyją fiołki
Fiołki jako kultura pokojowa są uprawiane od ponad wieku. Przy odpowiedniej pielęgnacji i regularnym odmładzaniu rośliny mogą żyć przez dziesięciolecia.
Z biegiem czasu zmniejsza się dekoracyjność fiołka, objawia się to odsłonięciem łodygi, rzadkim kwitnieniem oraz kurczeniem się kwiatów i liści. W rzeczywistości fiolet przestaje rosnąć. Jest to jednak jedna z tych roślin, które bardzo łatwo odmłodzić, po czym fiołek zakwitnie nie mniej bujnie i trwale niż wcześniej.
Jeśli łodyga jest ledwo naga - o 2 - 4 cm, a jednocześnie pozostaje zielona, roślina jest po prostu przesadzana na świeże podłoże, pogłębiając nagą łodygę, uprzednio usuwając uszkodzone i wysuszone liście.
W przypadku, gdy łodyga jest bardzo naga i wyraźnie szorstka, postępuj w następujący sposób.Ostrym, zdezynfekowanym nożem odcina się łodygę na poziomie ziemi. Powinieneś spróbować przeciąć łodygę za jednym razem. Następnie ostrożnie oderwij grubą tkankę od łodygi. Konieczne jest również odcięcie liści, pozostawiając tylko część na wierzchu rośliny. Podłoże wsypane do pojemnika do sadzenia należy wstępnie zwilżyć, w środku zrobić mały otwór i umieścić w nim roślinę.
Ponadto gleba wokół łodygi jest lekko zagęszczona i podlewana. Aby roślina szybciej się zakorzeniła, musi stworzyć warunki szklarniowe, dla których fiolet jest przykryty szklanym lub plastikowym pojemnikiem. Po kilku tygodniach roślina powinna się zakorzenić. W tym czasie musisz utrzymywać wymagany poziom wilgotności i regularnie wietrzyć roślinę.
Eksperci odradzają sadzenie kwitnącego fiołka. Zdarza się jednak, że młode rozety osiągnęły optymalny rozmiar do przesadzania, a krzew macierzysty nie „myśli” o zakończeniu kwitnienia. W tym przypadku fiołek sadzi się zgodnie z wcześniej opisaną kolejnością. Konieczne jest tylko usunięcie wszystkich szypułek, aby fiolet mógł aktywniej przywrócić system korzeniowy. W końcu im szybciej to się stanie, tym wcześniej zacznie kwitnąć.
Jak podzielić fiołek