Szklarnia przez Meathlider
Treść:
Od dawna zauważono, że plony uprawiane w szklarni są znacznie lepsze pod względem jakości i ilości od plonów uprawianych na otwartym polu. Nie ma ryzyka zamarznięcia sadzonek z powodu nieoczekiwanych zmian temperatury. A także rośliny są chronione przed silnymi wiatrami i złą pogodą. Dlatego instalacja szklarni na działkach staje się ostatnio coraz bardziej popularna. Szklarnia Meathlider jest jedną z takich opcji.
Szklarnia według Meathlider: opis
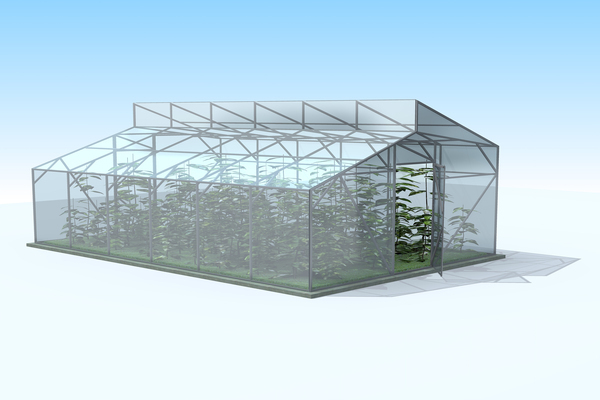
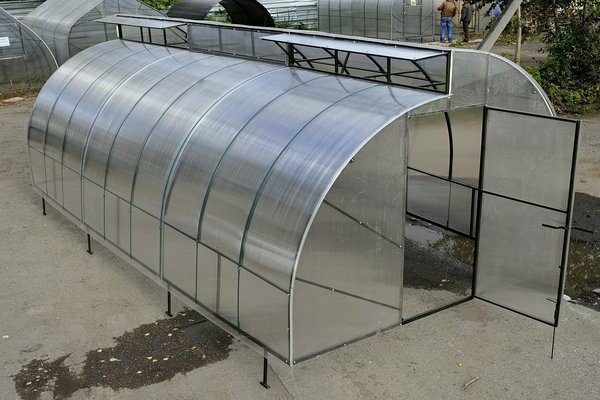
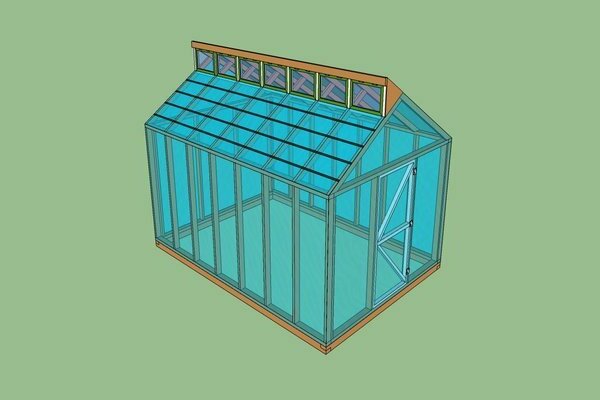
To imię doświadczonego technika. Profesjonalista w naukach rolniczych. To on stał się twórcą szklarni, która znacznie różni się od dotychczas stosowanych konstrukcji. W naszym kraju szklarnia ta nazywana jest również „amerykańską”. Wygląda jak mała konstrukcja. Jego charakterystyczną cechą jest obecność wielopoziomowego podwójnego dachu.
Pokój przypomina tę samą szklarnię. Jednak jedna strona dachu jest ustawiona na północ, a druga na południe. Północna strona dachu znajduje się powyżej poziomu strony południowej. Między nimi instalowane są rygle. Te rygle pełnią funkcję swobodnego przewodzenia powietrza w celu zapewnienia niezbędnej wentylacji roślinom. W ten sposób przez otwarte okna powietrze wchodzi do szklarni od strony południowej, podczas gdy w międzyczasie wychodzi ciepłe powietrze.
Korzyści cieplarniane
- Taka konstrukcja zapewnia bardzo dobry ruch ciepłego i zimnego powietrza. Dzięki temu nie ma ryzyka, że rośliny się przegrzeją lub uduszą.
- Nie trzeba tracić czasu, pieniędzy i wysiłku na instalację dodatkowej wentylacji.
- Konstrukcja została zaprojektowana w taki sposób, aby nie było potrzeby kupowania różnych butli i dozowników zawierających dwutlenek węgla.
- Amerykańska szklarnia jest bardzo trwała i niezawodna. Ponieważ zawiera dużą liczbę poprzeczek, belek. Jak również inne podpory. Dlatego nie martw się, że zła pogoda go uszkodzi. A także obfitość opadów w zimie.
- Cała konstrukcja składa się z poprzeczek, które są połączone z najczęstszymi narzędziami. Mianowicie: wkręty samogwintujące, śruby. Wszystko to upraszcza proces montażu i demontażu konstrukcji.
- W razie potrzeby przeniesienie go w inne miejsce nie będzie trudne. Ponadto dach jako ostatni łączy się ze ścianami. Upraszcza to również sam proces montażu. A także wymianę uszkodzonych części.
- Ze względu na niską wysokość ścian wygodniej jest uprawiać ogrodnictwo w takiej szklarni.
- Projekt jest starannie przemyślany w taki sposób, aby jego wymiary i przestrzeń wnętrza tworzyły optymalny klimat dla roślin. A także przestrzeń użytkowa mieści wystarczającą liczbę upraw.
- „Amerykański” ma dwuwarstwową skórę, między którą jest dość duża luka. Około 5-7 cm Ta poduszka powietrzna zapewnia optymalną izolację termiczną.
Z niedociągnięć tylko duża liczba szczegółów konstrukcyjnych. To nieco komplikuje montaż. A także koszt tej szklarni będzie wyższy niż w przypadku innych. Jednak koszty pokrywają się. Ponieważ nie ma potrzeby instalowania dodatkowej wentylacji. A także specjalne butle z dwutlenkiem węgla. Ponadto jakość i ilość plonu uprawianego w tej szklarni rekompensuje wady.
Miejsce do instalacji
Jeśli zdecydujesz się umieścić amerykańską szklarnię na swojej stronie, musisz najpierw wybrać miejsce.Ważne jest, aby zwrócić uwagę na kilka czynników:
- Pożądane jest, aby teren był równy. Jeśli na Twojej stronie nie ma płaskiego miejsca, konieczne będzie jego zorganizowanie lub zbudowanie.
- Musisz także zwrócić uwagę na punkty kardynalne. To bardzo ważne, aby uzyskać pożądany efekt. Górny poziom dachu powinien być skierowany na stronę północną. A dolny stok powinien być skierowany ściśle na południe. W rezultacie końcowe strony konstrukcji będą zwrócone na zachód i wschód.
- Ponadto dobrze będzie, jeśli szklarnia będzie znajdowała się w otwartym, słonecznym miejscu. Ważne jest, aby w pobliżu nie było żadnych konstrukcji. A także drzewa, które stworzą cień. Najlepiej, jeśli słońce pozostaje na tym obszarze przez cały dzień. Ale jeśli nie jest to możliwe, można wybrać obszar, w którym słońce pozostaje przez całe popołudnie.
- Ponadto efekt szklarni będzie gorszy, jeśli zostanie zainstalowany na nisko położonych obszarach. Lub na glebach torfowych.
Szklarnia według Meathlider: fundacja
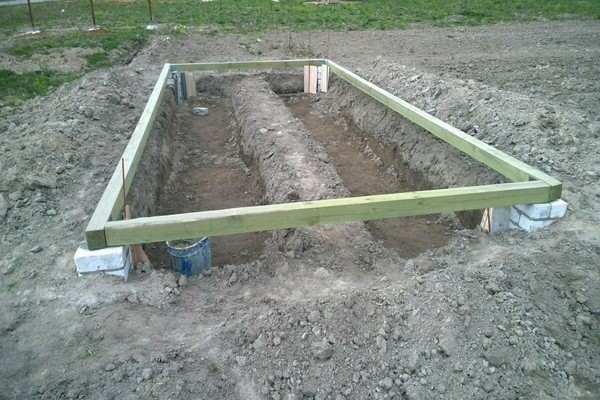
Pomimo tego, że szklarnia jest prostą konstrukcją, nadal potrzebny jest tutaj fundament. Można zainstalować fundament punktowy. Będzie najtańszy i najłatwiejszy w produkcji. Na drugim miejscu jest fundament z drewna. A ostatnią opcją jest podkład w paski. Na tym etapie będziesz musiał dużo wydać i ciężko pracować.
Aby zorganizować fundament punktowy, będziesz musiał uzbroić się w drewniane belki lub kołki, których długość wyniesie około pół metra. Miejsce na szklarnię musi być oczyszczone z chwastów, kamieni i innych gruzu. W razie potrzeby teren należy wyrównać. Następnie ważne jest, aby zmierzyć ostrożnie i ostrożnie. A także zaznacz wymiary przyszłej struktury. Do tych celów najczęściej używa się małych kołków z liną. Następnie powinieneś dokładnie wbić belki w różne zakątki przyszłej szklarni. Pręty wbijane są do poziomu gruntu. Wszystkie pozostałe kołki muszą być wbijane w niewielkiej odległości od siebie. Ważne jest, aby te luki były równe.
Fundament drewniany
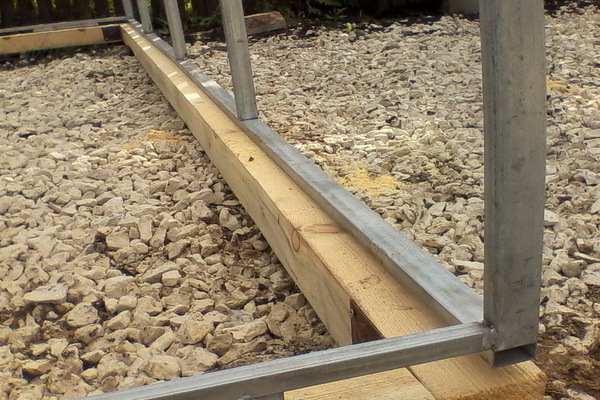
Aby zbudować kwadratowy fundament, będziesz potrzebować dużych kwadratowych belek. Około 15 na 15 cm Po wystarczającym oczyszczeniu terenu z gruzu i zakończeniu wszystkich oznaczeń konieczne jest wykonanie głębokiego rowu wzdłuż tych oznaczeń. Powinien być równy grubości belek i nieco większy. Powstałe rowy należy ubić i wyrównać. Ponadto do wykopanych rowów wlewa się piasek. I jest starannie zagęszczony. Możesz go również podlać.
Następnie w wykopie umieszcza się jakiś materiał hydroizolacyjny. Może to być polietylen lub materiał dachowy. Pręty, z których zostanie wykonana szklarnia, muszą zostać zdezynfekowane. A następnie w tych wykopach układane są przygotowane belki. Są mocowane razem za pomocą gwoździ lub wkrętów samogwintujących. Powstały fundament powinien wznosić się nie więcej niż 5 cm nad ziemią. Na belkach należy ułożyć kolejną warstwę materiału hydroizolacyjnego.
Podkład w paski
Podkład z taśmy posłuży przez długi czas. Ale będzie to kosztowny proces. A także wysiłek ogrodnika. Fundamenty taśmowe mogą wspierać bardzo ciężkie konstrukcje. Aby to ustalić, strona jest również odpowiednio czyszczona. I oznaczenia są wykonywane. Następnie powinieneś wykopać rów. Szerokość około 25 cm i głębokość co najmniej pół metra. Gleba w wykopie jest zagęszczana. Wtedy potrzebujesz piasku. Ale najlepszą opcją jest mieszanka piasku i żwiru. Ta mieszanina musi być ułożona w warstwie około 10 cm, a także zagęszczona.
Następnie z desek wykonuje się szalunek. Jeśli chcesz, aby podkład był super mocny, możesz również dodać kratkę ze stalowego pręta. Chociaż w przypadku amerykańskiej szklarni nie jest to konieczne. Kolejnym krokiem będzie przygotowanie mieszanki betonowej. W tym celu pobierany jest cement - 1 część, piasek i kruszony kamień. Z tej mieszaniny przygotowuje się roztwór.Należy go rozcieńczyć wodą na kilogram cementu - pół litra wody. Przygotowany wykop wylewa się powstałą mieszanką betonową. Po czym powinien wyschnąć przez około tydzień. Następnie należy zdemontować szalunek. I pozostaw konstrukcję na około miesiąc na ostateczne utwardzenie betonu. Następnie możesz zacząć budować szklarnię.
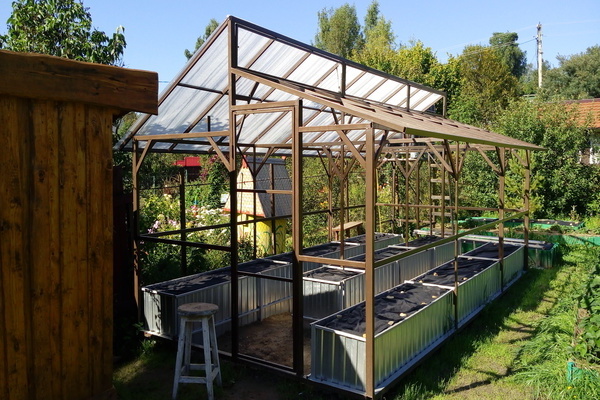
Szklarnia według Meathlider: rama
Aby zbudować przyszłą szklarnię, najbardziej optymalnym materiałem jest drewniana belka. Jest to najłatwiej dostępny materiał, z którym wygodnie się pracuje. Ponadto zaletą jest brak kondensacji. Cała rama naszej szklarni będzie składać się z podstawy, ścian. A także dach, drzwi i okna. Aby połączyć drewniane belki o różnych rozmiarach, potrzebujesz wkrętów samogwintujących i metalowych narożników. A także talerze.
Największe belki zostaną użyte do podstawy szklarni. Do montażu ścian, okien i drzwi potrzebne będą belki o wymiarach 50 mm na 70 mm. A do montażu dachu lepiej jest wziąć belkę 40 mm na 150 mm.
Produkcja ramy
Do zbudowania drewnianej ramy potrzebne będą również narzędzia takie jak śrubokręt, śrubokręt, taśma miernicza, piła, drabina. Podobnie jak inne zapasy, ponieważ wynikowa rama będzie nadal musiała być pokryta olejem lnianym lub środkiem antyseptycznym. Jeśli jesteś osobą kreatywną, możesz pomalować ramkę farbą.
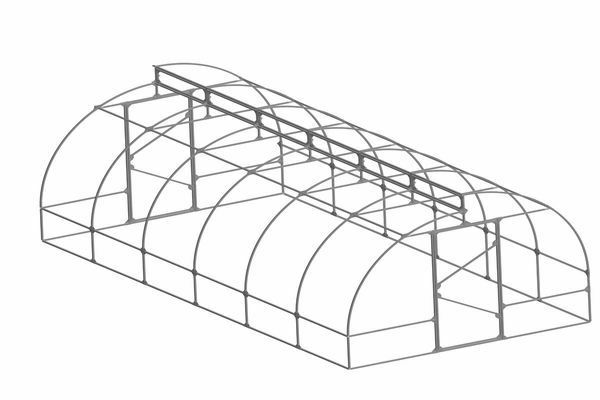
Jeśli za podstawę przyjmiemy szklarnię Mitlidera, wówczas wymiary będą następujące: szerokość 6 metrów, długość 12 metrów, wysokość 2,7 metra. A wysokość ścian wynosi 2 metry. Niższy poziom dachu będzie pod kątem 20 stopni. A kąt północnej strony dachu jest pod kątem 35 stopni. W razie potrzeby dopuszczalne są zmiany tych wartości. Nie odbiegaj jednak zbytnio od standardu. Bo dach mógłby się zawalić. Lub struktura nie będzie działać poprawnie.
Aby konstrukcja była dokładniejsza i bezbłędna, najlepiej wcześniej wykonać rysunek na papierze. Albo za pomocą komputera. Przede wszystkim przygotowywana jest baza. Największe batony należy pokryć olejem antyseptycznym lub schnącym. Ta baza będzie praktycznie na ziemi. Dlatego nie powinieneś tu skąpić. Aby wykluczyć gnicie materiału. Następnie wyrzynarką należy odciąć nadmiar elementów. Następnie powinieneś zaprojektować pudełko. A także przymocuj belki razem za pomocą żelaznych płyt i wkrętów samogwintujących. Końcowe boki pudełka zostaną przymocowane narożnikami.
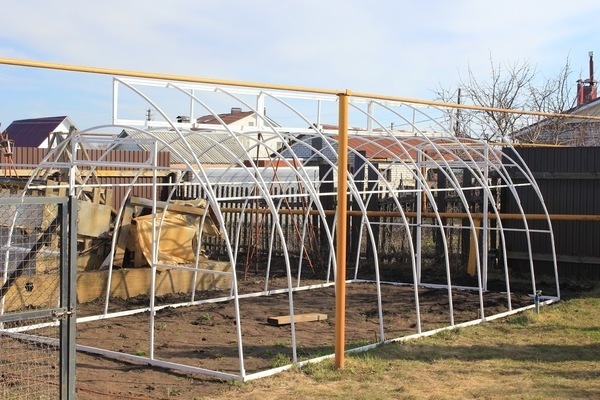
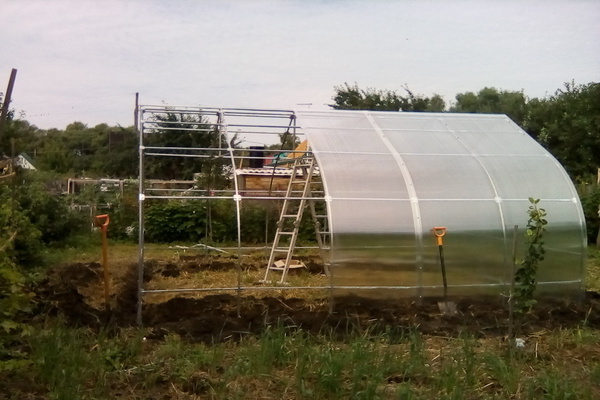
Szklarnia według Meathlider: montaż ramy

Po zbudowaniu drewnianego pudełka na podstawę przyszłej szklarni konieczne jest ponowne sprawdzenie wszystkich wymiarów pudełka za pomocą taśmy mierniczej. Metoda pomiaru przekątnych będzie dokładniejsza. Za pomocą poziomicy podstawa jest w razie potrzeby wypoziomowana. Następnie naszą bazę należy położyć na przygotowanym fundamencie. Następnie możesz przystąpić do projektowania ścian. Będą one wykonane z belek 50mm x 75mm. Materiał drewniany również należy wcześniej zdezynfekować. A jeśli chcesz, możesz go pomalować na dowolny kolor.
Następnie belki są przygotowywane do podpór pionowych, których wysokość wyniesie 2 metry. A także drążki do ustawiania poziomego blatu. Wszystkie części są również ze sobą połączone. I są utrzymywane razem przez metalowe płytki. A także narożniki z wkrętami samogwintującymi. W odległości około 2 m należy zamontować wsporniki pionowe. Poprzez te same metalowe łączniki i śruby. Ważne jest, aby ułożyć drewno w taki sposób, aby wąskie boki były skierowane do wnętrza konstrukcji.
Na ścianie południowej montowane są dodatkowe sufity poziome. W odległości pół metra od górnej granicy muru. Tutaj zostaną zainstalowane okna. Aby uzyskać lepszą i trwalszą konstrukcję, można postawić skarpy od ściany południowej i północnej. Ostatnim krokiem będzie połączenie wybudowanych ścian z naszą bazą.
Wykonywanie ścian szklarni
Następnie możesz zacząć tworzyć ściany końcowe i montować drzwi. Wszystkie belki są starannie obrabiane. Są też przygotowywani do przyszłej budowy. Konieczne jest zaprojektowanie i zmontowanie drzwi o wymiarach 70 mm na 180 mm. Nie zapomnij też o poziomym pasku pośrodku. Spoiny można łączyć za pomocą metalowych narożników. Lub trójkąty ze sklejki. Po zbudowaniu drzwi należy zamontować klamki, zawiasy i zamek.
Powstały prostokąt jest osłonięty poliwęglanem. Możesz także użyć polietylenu. Należy to zrobić po obu stronach, aby zapewnić lepszą izolację termiczną. Następnie budowane są ściany końcowe szklarni. I są przymocowane do wspornika za pomocą wkrętów samogwintujących i narożników. Po zamocowaniu podpór poziomych należy zamontować belki pionowe. W odstępie około 2 metrów. Będzie to rama, w której zostaną zainstalowane drzwi. Aby uzyskać lepszą wytrzymałość, można wykonać zbocza. Projektowane ściany należy przykleić do strony południowej i północnej konstrukcji.
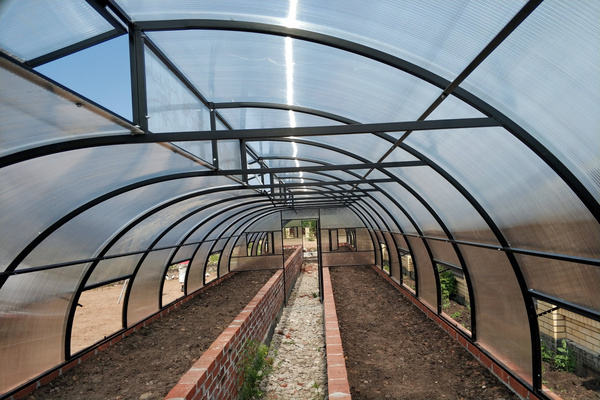
Szklarnia według Mietlidera: etap końcowy
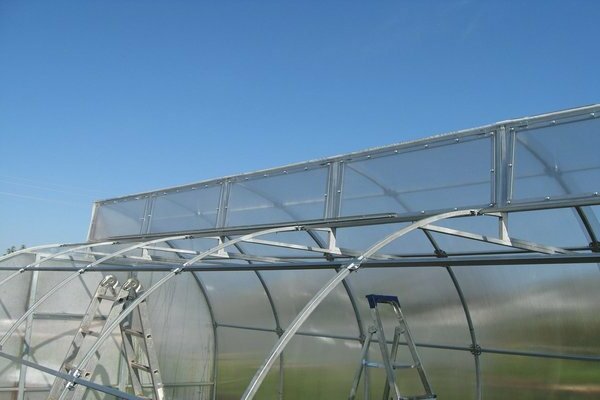
Teraz możesz przejść do ostatniego etapu - budowy dachu. Tutaj musisz wykazać się maksymalnym wysiłkiem i starannością. Aby dokładnie ukończyć projekt. Ponieważ od tego będzie zależeć wentylacja. Konieczne jest zainstalowanie poprzeczek między ścianami z odstępem dopasowanym do słupków długich ścian. Belki należy przymocować do wsporników znajdujących się pośrodku, tworząc podstawę ściany. Który będzie znajdować się między dwoma połaciami dachu. Ponadto belka będzie służyć jako rama okienna. Belki powinny być ustawione w odstępach około 40-50 cm.
Dalej wzdłuż krawędzi konieczne jest zamontowanie krokwi. Są one połączone z belkami za pomocą nacięć. Alternatywnie możesz użyć dodatkowego wspornika. Następnie z pozostałych belek należy przygotować rygle o wymiarach 1,5 na 2 metry. Liczba rygli tutaj będzie zależeć od długości szklarni. Rygle muszą być wyposażone w zawiasy, różne uchwyty. A także schować z dowolnym materiałem. Na przykład poliwęglan lub polietylen.
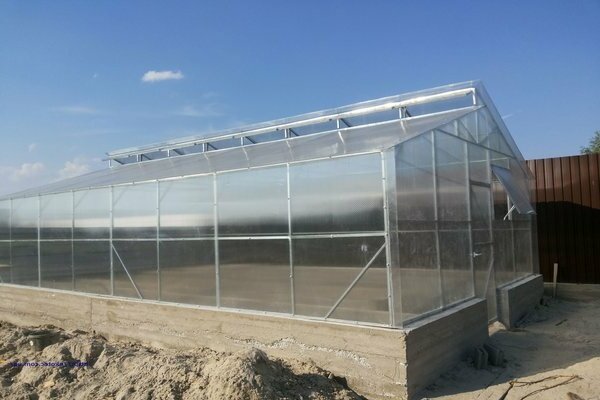
Materiał poszycia
Wreszcie cała rama konstrukcji jest osłonięta. Materiał jest wciąż ten sam. Albo folia, albo poliwęglan. Tutaj wszystko będzie zależeć od czasu obsługi materiału. Oznacza to, że jeśli zdecydujesz się wybrać materiał, który przetrwa tylko 1 sezon, wystarczy zwykła plastikowa folia. Jeśli chcesz używać powłoki przez dłuższy czas, nie będziesz potrzebować zwykłej folii, ale specjalnej. Który nie straci swojego wyglądu i funkcji pod wpływem słońca. Musi zostać wzmocniony. Oznacza to większą wytrzymałość, aby nie przełamać się od silnych wiatrów i pod naporem śniegu. A także służyć przez kilka lat.
Folia z powłoką antystatyczną nie gromadzi kurzu i brudu. Ponieważ wpływa na nośność promieni słonecznych, które są tak niezbędne dla dobrego wzrostu. A także rozwój kultury. Dobra folia z powłoką hydrofilową zapobiega przedostawaniu się wilgoci do sadzonek. Jedną z zalet polietylenu jest jego niewielka waga. Umożliwi to wykonanie lżejszego podkładu. Na przykład punkt lub słupek. Ponadto film szybciej się nagrzeje. Jednak jednym z niedociągnięć jest obecność zbyt gwałtownej zmiany temperatury w projekcie.
Szklarnia według Mitlidera: jak schować ramę
Aby pokryć ramkę folią, odmierz potrzebną ilość folii. Odetnij i przeciągnij przez dowolną część dachu lub ścian. Folię mocuje się drewnianymi listwami na wkrętach samogwintujących. Co więcej, to samo należy zrobić z wnętrza szklarni. Opisany algorytm należy zastosować dalej dla pozostałych odcinków konstrukcji. W ten sposób osłonięte są drzwi i okna.
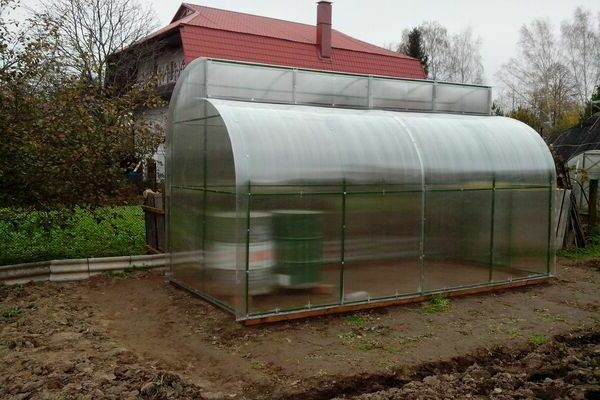
Konieczne jest osłonięcie szklarni po obu stronach.Ponieważ poduszka powietrzna, która tworzy się między dwiema warstwami folii, będzie działać jak izolacja termiczna. A zmiana temperatury nie nastąpi tak nagle. Co będzie miało pozytywny wpływ na roślinę. Arkusze poliwęglanowe przewyższają materiały polietylenowe pod względem wytrzymałości i zatrzymywania ciepła. Należy jednak pamiętać, że jest dość ciężki. A to będzie wymagało wytworzenia solidnego fundamentu.
Jeśli używasz poliwęglanu jako okładziny, wymagana jest tylko okładzina na zewnątrz szklarni. Wewnątrz nie jest potrzebna okładzina. Należy zwrócić uwagę na właściwości zakupionego materiału, gdyż na trwałość okładziny wpływa również kilka czynników. Arkusze poliwęglanowe są przymocowane do szklarni za pomocą wkrętów samogwintujących. Aby uprościć proces, zaleca się wcześniejsze zmierzenie i wykonanie otworów w arkuszach. A następnie przymocuj je do ramy. Pomoże to również jeszcze bardziej uprościć proces wymiany uszkodzonych materiałów i arkuszy.
Ponadto przy mocowaniu poliwęglanu należy zadbać o to, aby krople kondensatu mogły spływać.
Wniosek
Szklarnia według Meathlider to doskonały wybór dla ogrodników i letnich mieszkańców. Ten projekt spełnia wszystkie funkcje niezbędne do uprawy roślin. Ponadto możesz to zrobić sam.